
More and more people start to worry about big tech companies that keep gathering your personal information. It is possible to significantly reduce the privacy impact of the most widely used workstation operating system: Windows 11.
In an age where digital privacy and security are paramount, it’s crucial to ensure that your Windows 11 installation is optimised to safeguard your personal information. Let me guide you by going through the essential steps to help you take control of your system’s privacy and security settings.

Considering a clean installation?
Most of the settings below are prompted for at the initial installation of Windows. Please make sure you read them carefully and select the most privacy-friendly option, while ignoring Microsoft’s data-hungry recommendations.
To install Windows without a Microsoft account, make sure you don’t have an internet connection during the installation. When the screen Is this the right country or region? shows up, use the key combination Shift + F10 to open a command prompt and execute: OOBE\BypassNRO.cmd. You will then be able to setup Windows 11 with a local account by selecting I don’t have internet further on. As soon as everything has been set up and the desktop shows up, you can connect to the internet safely.

1. Switch to a local user account
A Microsoft account is used by more and more services of Microsoft and even by third parties. It has become a gathering point for collecting as many data from you as possible. Hence, it is essential to get rid of the Microsoft account.
You can switch to a local user account by going to the Settings –> Accounts –> Your info –> Sign in with a local account instead. Go through the steps to switch to a local account. Please ignore the statement that it is not recommended: that’s just to keep you back on the data gathering track 😉.
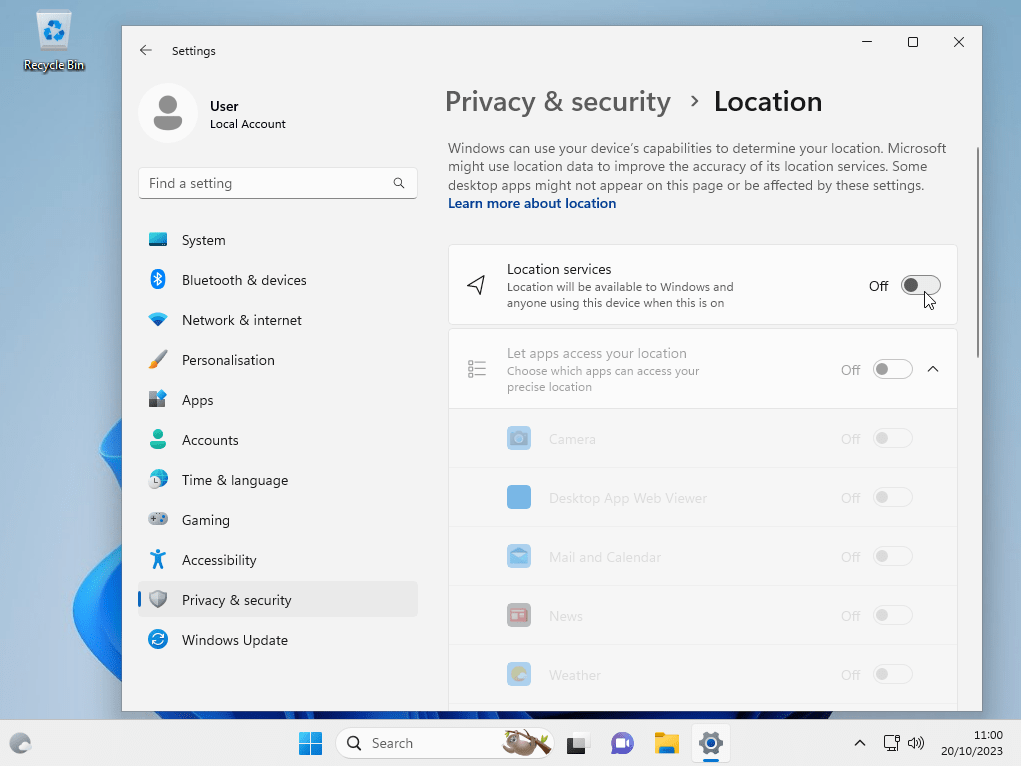
2. Disable location tracking
Your location is very privacy sensitive information. Revealing your location can disclose where you live, work, or frequently visit. This private information can be used to build a profile about you, including your daily routines, habits, and preferences. This data becomes vulnerable to data breaches and potential government surveillance.
If you don’t want Microsoft and third parties to access your location, you should disable location tracking. You can do so by going to Settings –> Privacy and Security –> Location –> Location services. Turn it off.
3. Disable ad tracking
You don’t want Microsoft to generate an ad profile about you? Then you really need to turn off ad tracking. Ad tracking creates a profile of a person’s interests and Microsoft sells this data to third parties. By disabling ad tracking, you can mitigate the creation of your ad profile.
To turn off ad tracking, go to Settings –> Privacy and Security –> Let apps show me personalised ads by using my advertising ID. Turn it off. We also recommend to disable the other settings below it.
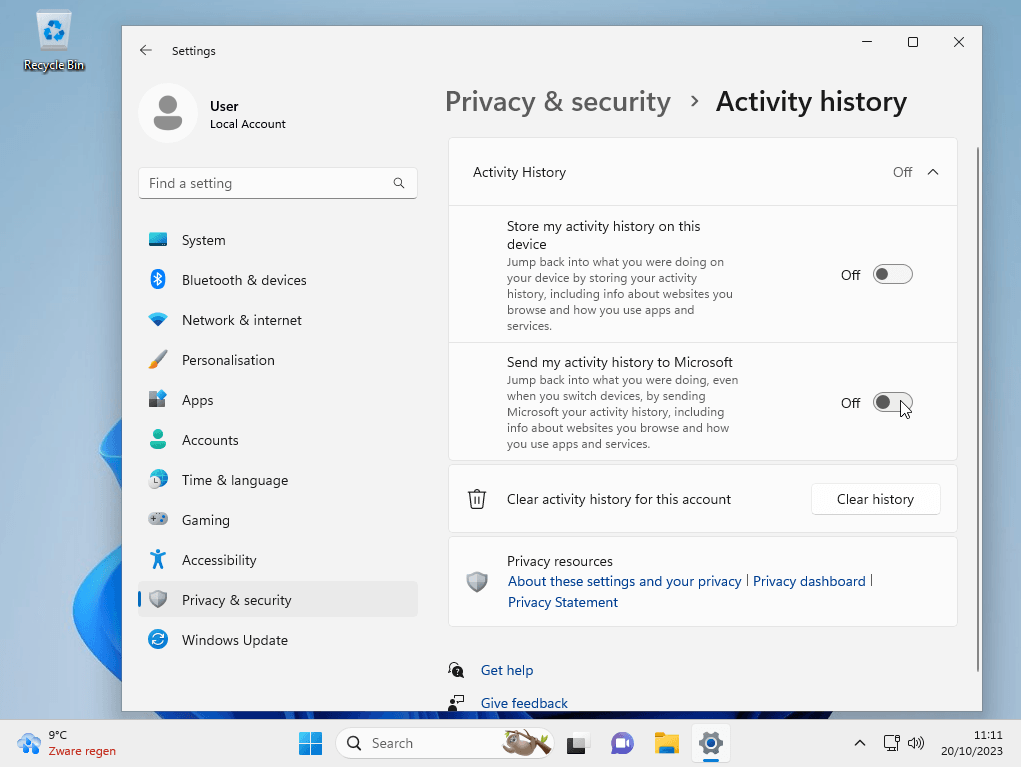
4. Disable activity history
Even if ad tracking has been disabled, Microsoft still gathers information about what you are doing on your PC, including the websites you browse and what you search for. Even if you don’t use Edge as your web browser, you might still use the Search functionality of Windows, which can lead to privacy issues.
To stop this data collection, go to Settings –> Privacy and Security –> Activity history –> Send my activity history to Microsoft. Turn it off. We also recommend to disable the option above it: Store my activity history on this device.

5. Disable the camera and microphone for certain apps
This recommendation is especially for laptops and tablets. You don’t want any random application being able to get access to your camera and microphone. Therefore, it is important to restrict the access of the camera and microphone. Optionally, you can make some exceptions.
To manage this, go to Settings –> Privacy and Security –> App permissions and set your preferences for the camera and microphone. Make sure that the camera and microphone access is disabled for as many apps as possible, or even entirely disabled if you don’t need it.
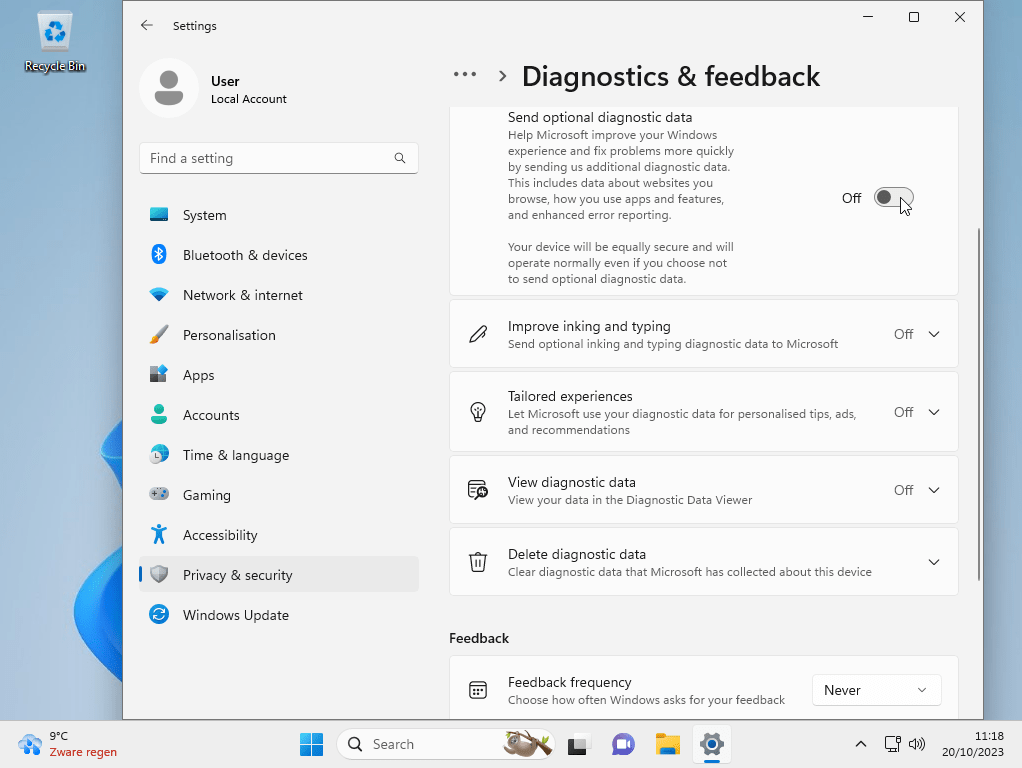
6. Limit Windows Telemetry and Diagnostic data
By default, Microsoft gathers information about your device and it has access to your log files and system settings. Even though it sounds harmless at the first glance, think about it. Is it really harmless for you if Microsoft’s third parties would know what text and input settings you are using, what computer errors you are facing and if you are using a computer with either low performance or outstanding performance? Data marketing companies love this kind of data.
Unfortunately, you cannot fully stop this so-called Windows Telemetry service by using Settings. So basically, you can blame Windows for being spyware anyway. However, you can still limit the amount of data that is being gathered by going to Settings –> Privacy and Security –> Diagnostics and Feedback. Deselect the options Send optional diagnostic data, Improve inking and typing and Tailored experiences. Also, make sure you have deleted all diagnostic data at the bottom section and select Feedback frequency –> Never.
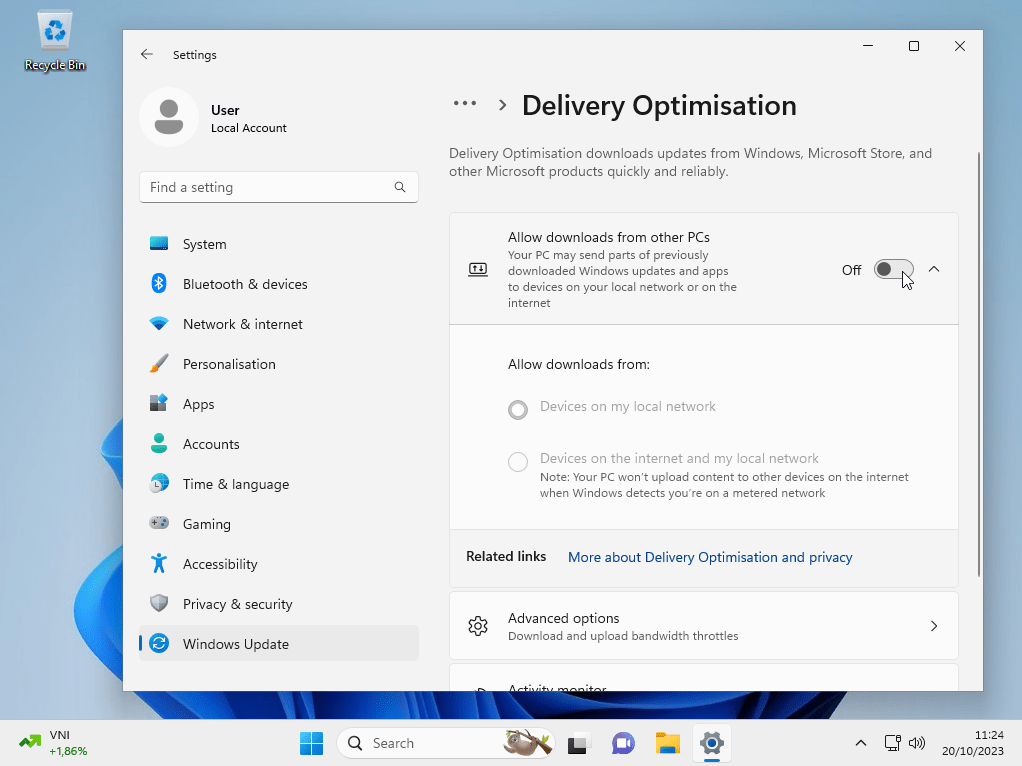
7. Disable Windows Update Delivery Optimisation
While updates are crucial for security, sharing them with other users on your network might compromise your privacy. Moreover, sharing Windows updates is a potential security problem: do you really trust anybody’s computer to deliver a Windows Update for you? At NovaCustom, we believe that limiting your download sources can help to improve your security.
You can disable Delivery Optimisation via Settings –> Windows Update –> Advanced options –> Delivery Optimisation. Switch off the setting Allow downloads from other PCs.
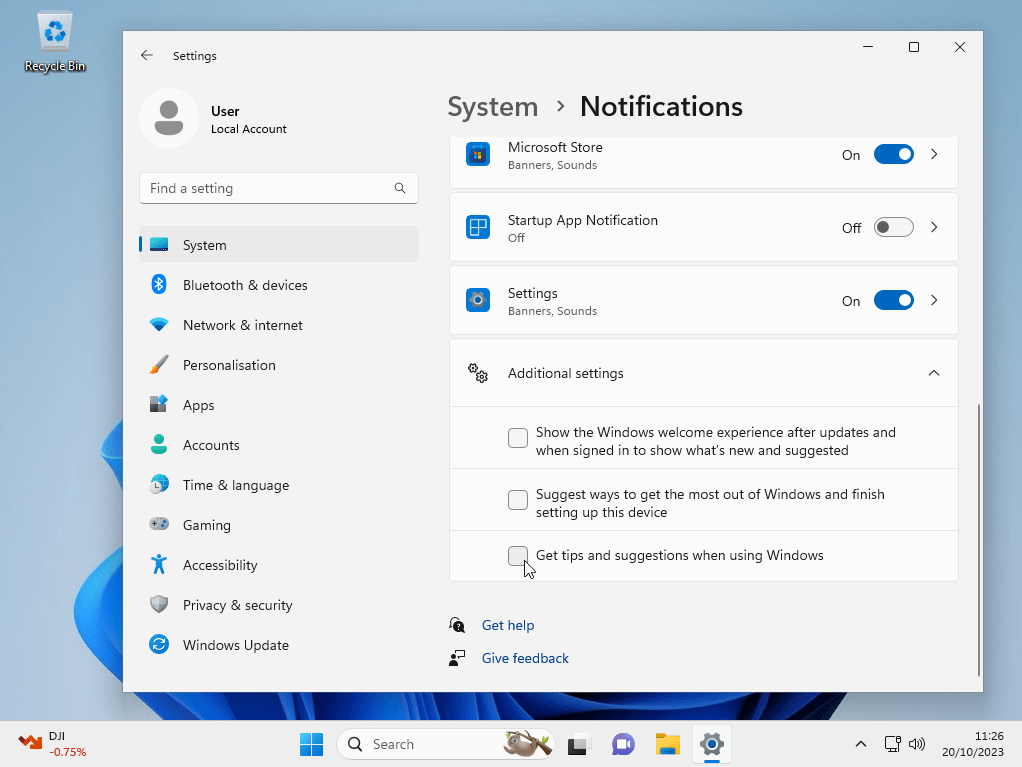
8. Switch off annoying notifications of Microsoft’s ‘useful tips’
Yeah … Useful tips, right? To improve your user experience? Let me be honest with you: that’s completely nonsense. In fact, these are just attempts to get you back on the data gathering track. If you don’t proceed with this step, you will keep getting pop-ups from Microsoft who will try to force you to use a Microsoft account again.
To put a stop to that, go to Settings –> System –> Notifications –> Additional settings. Untick all the checkboxes there.
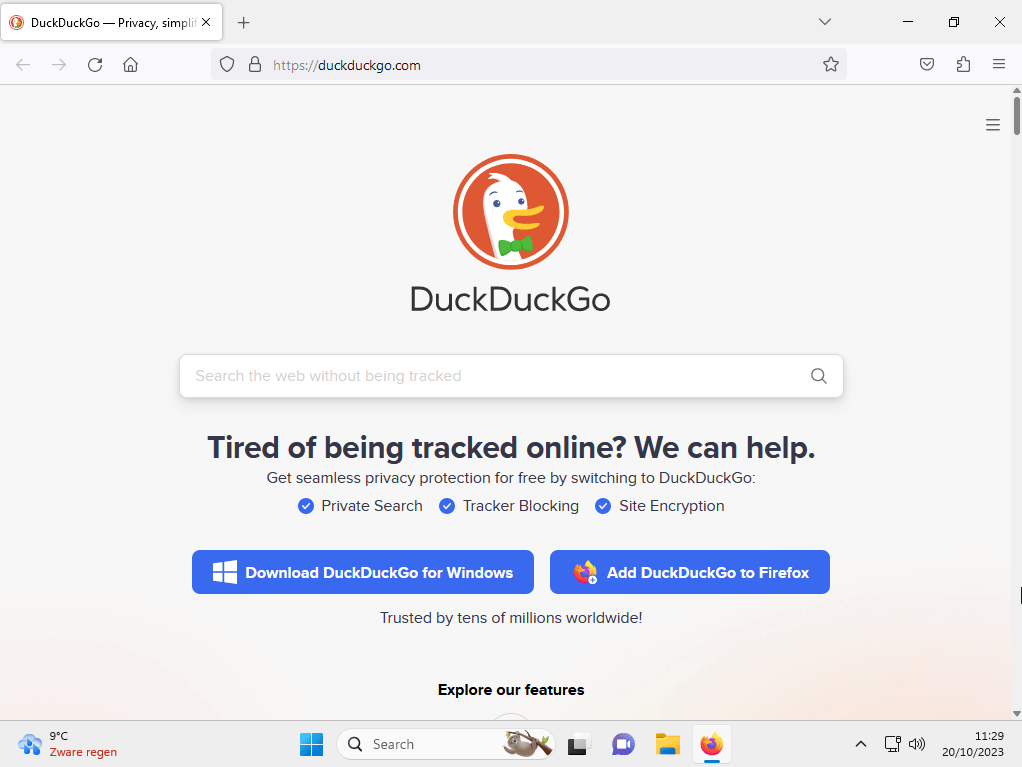
9. Stay away from Edge and switch to Firefox
Microsoft’s web browser, Edge, is deeply integrated into Windows 11. This might sound as an advantage, but imagine what it means for data collection. As the source code of Edge is closed-source, it’s hard to analyse what the privacy impact of Edge is for you as a user. Also, with the recommended options of Edge, Microsoft even admits that it is using your data to ‘improve your user experience’. But they actually mean ‘to fill our pockets by using your data’.
Mozilla Firefox is an open source alternative browser. It is designed to be way more privacy-friendly. So if you want to protect one of your most privacy sensitive data – your online activity – we highly recommend to switch to Firefox and make it your default browser. And if you would like to use a privacy-friendly search engine, we recommend DuckDuckGo.
Some more useful tips to improve your online privacy
- Don’t use Cortana. Cortana is Microsoft’s virtual assistant, which is a data hunting tool.
- Don’t use OneDrive. There are privacy-respecting and safer online storage alternatives like Proton Drive.
- Use a VPN. We highly recommend Mullvad, as it is a privacy-focused VPN service.
- Consider switching to a GNU/Linux operating system. The problem with Windows is that you don’t know for sure that it (only) does what it says it does. This is because the way it works, defined by its source code, is behind closed doors: there is no way to prove Microsoft’s claims about privacy and security.
GNU/Linux operating systems such as Ubuntu, Linux Mint and Fedora offer a computing experience that is focused on privacy and software freedom. These community-based operating systems are mostly open source, which means that the functionality is transparent and the claims about privacy and security can be validated. I recently wrote another blog post in which I described what can be the best Linux distribution for you.
And finally, if you are looking for a new laptop, we offer laptops with either Windows 11 Pro privacy-optimised or laptops with Linux pre-installed. Or even both as Dual-Boot, or with Windows within a virtual machine. Just like the mentioned GNU/Linux operating systems, most of the source code of our laptop’s controlling software (called ‘firmware’) is open source. This is thanks to the Dasharo coreboot firmware distribution that we use. You can check out all laptops we offer here.
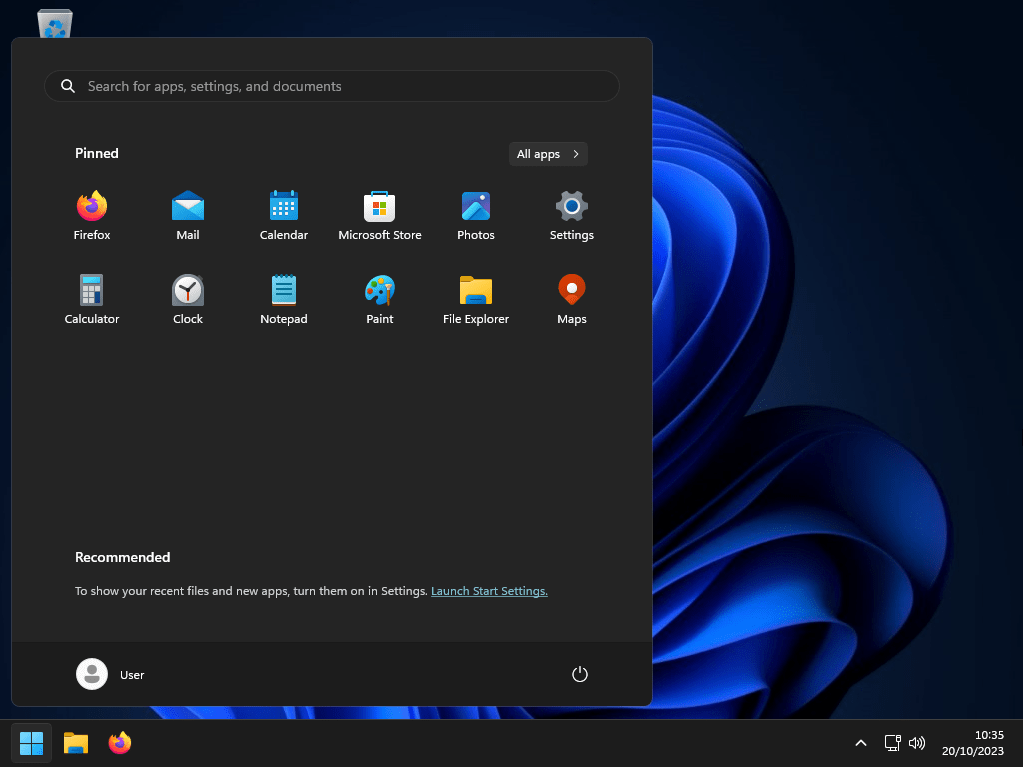
Bonus: make Windows 11 cleaner and faster
By default, Windows 11 is full of bloatware and features you don’t need. These features are very disturbing. We recommend to set a dark theme and clean up all those features you don’t need. Now that’s what I call an enhancement of the user experience! Maybe Microsoft can learn from that.
To sum up, our recommendations for a better user experience are:
- Switch to a dark theme: right click on the desktop –> Personalise –> switch to the Windows (dark) theme.
- Disable transparency: Personalisation –> Colours –> Transparency effects. Turn it off.
- Add Computer and User’s Files as desktop icons: Personalisation –> Themes –> Desktop Icon Settings. Adding the user’s folder and the This PC icon gives you easier access to these locations.
- Clean the lock screen: Personalisation –> Lock screen –> Personalise your lock screen. Change it to Picture and untick the checkbox Get fun facts, tricks and more on your screen. You might also want to set Lock screen status to None.
- Clean up the Start menu: Personalisation –> Start –> Layout –> select More pins and turn off the features Show recently added apps and Show recently opened items in Start, Jump Lists and File Explorer. In the Start menu itself, delete all apps you don’t need, and pin the ones you will probably use frequently.
- Clean the task bar: Personalisation –> Taskbar –> Taskbar items. Deselect Chat, Widgets and Task view. Disable the Search box. Under Taskbar behaviours, change Taskbar alignment to Left. At the taskbar itself, remove all pinned items, except the file explorer and your default browser (Firefox, right? Very good!).
- Disable unnecessary startup applications: Open the application Task Manager and click on Startup apps in the menu at the left side. Disable all applications that don’t need to be started during startup.
Result:
Wessel klein Snakenborg (Director of NovaCustom)
About the author: Wessel Klein Snakenborg is passionate about technology since childhood. He launched NovaCustom in 2015, crafting tailor-made laptops with privacy and security in mind. With a focus on user-friendliness, NovaCustom continues to redefine the laptop experience, led by Wessel's commitment to innovation and collaboration.